Showing posts with label flower. Show all posts

Wednesday, 24 February 2016

Celebrate Your Day

Hello & welcome to my second post today!
Sharing a card I made keeping in mind the W&W belated 2nd birthday bash.
This card is very different from my style. It is not just a single layer card (and yet has multiple layers) so to say but also the colors used are not the ones I usually work with. Would love to know what you think of it.

For the card I embossed the kraft card base with WRMK embossing folder. The frame is a die cut (about 4 layers) & colored with Chameleon pens. The double layered rose in the same color is is fussy cut. The stamped leaves & sentiment are from W&W.


Added some highlights to the flower & leaves with a gel pen.


The part of the card front within the delicate frame has shimmer (Wink of Stella)


Sharing this at - 
Winnie & Walter - Two Challenge - (two banners & two layers in the rose) - 29.2
Eureka Stamps#181 - die cut, embossing, flowers - 28.2 - WINNER


Scrapbook Stamp Society#85 - 28.2 - WINNER

Thank you so much for visiting & taking the time to comment on my blog. I love to hear from you & truly appreciate your feedback. Have a crafty day!

Tuesday, 5 May 2015

Craft Your Passion#260

Hello & welcome here again!
There's a new challenge on Craft your Passion Challenge blog and our theme is 'Anything Goes'.  For all the details about the challenge, hop over to the challenge blog.

Our sponsor this week is:


I selected the digi - butterfly scent (colored with Chameleon pens) to make my card.


Sharing this at - 


Thank you so much for visiting & taking the time to comment on my blog. I love to hear from you & truly appreciate your feedback. Have a crafty day!!


Friday, 26 September 2014

Altered Chest of Drawers

Hello friends!
I am here with a gorgeous girly altered project I made for my niece.
The 9 drawer chest is from Craftslane. Had a lot of fun with pattern papers  (co-ordinated papers from two packs here - Prima Fairy Rhyme & American Crafts - Lucky Charm).


The little frame here is a Kaisercraft embellishment colored with markers. The vintage image is fussy cut from the Prima - divine collection pack & covered with mod podge dimensional magic to give a faux glass effect.


The glass bottle have a cute lock & key charm set.
 

The MDF laser cuts on the side panels are colored with markers & heat embossed with clear EP for glossy finish. The key-charms are pretend pulls for the drawers.


Linking this to -
BGC#59 (30/9) - TOP 3

LTSCB#38(28/9)

Wednesday, 11 June 2014

JustRite Challenge#122

Hello!!
Over at Justrite Friday Challenge#122 they have challenged us to create a card with a matching envelope. This is my second entry there. You can see the first here

The coordinating set I made using Justrite stamps -


Used the WRMK envelope punch board to make this - 


The stamped image is colored with distress inks -


Supplies Used - 
CS - purchased locally
Pattern paper - DCWV mattstack Pocket full of posies
Dies - CL lace corner deco E, SB Nestabilities Gold Labels 4
Stamps - Justrite stamps Seeds of summer, Grand sentiments
Inks - Archival ink, DI - peacock feathers, mowed lawn, picked rasberry, mustard seed
Others - brad, trim

Sharing this at - 


Thank you so much for visiting & taking the time to comment on my blog. I love to hear from you & truly appreciate your feedback. Have a crafty day!!

Tuesday, 4 March 2014

Acetate Card

Good Morning.............it is so wonderful to have you visit here again.

Catchy Challenges is back with a new transformed look, lots of inspiration & a new name - CSCC - Create Something Catchy Challenge. Hop over to the blog here for deets & don't miss the new fun batches! For this months challenge Deepti has challenge us to create a card inspired by this picture -


This is my card - 


I loved the challenge colors & the pattern paper (layered over black card stock) is so close to the colors in the picture. The front of the card is acetate & the washi tape border & the intricate die cut were enough to decorate the panel. The sentiment is glued to the inside of the card.

Linking to -


Thank you so much for visiting & taking the time to comment on my blog. I love to hear from you & truly appreciate your feedback. Have a crafty day!!

Thursday, 20 June 2013

Dynamic Duos # 57

Another very quick post from me today.
This is a card for Dynamic Duos DD#57........


Thank you so much for visiting & taking the time to comment on my blog. I love to hear from you & truly appreciate your feedback. Have a crafty day!!

Wednesday, 5 June 2013

A Flower Tutorial & Some Wins

Hello everyone!!!
This has been a very pleasing crafty week for me so far with a couple of wins - this altered jar made it to the top 3 at Whoopsi Daisy Challenge & Itsy Bitsy - Pristine Sparkle Challenge, this card made it to the Top 3 at Incy Wincy Challenge & this altered box got a  honorable mention at Crafters Corner Summer Sundae Challenge, aren't these wins enough to be delighted & share with you all!! I also posted a review on Distress Paints for The Craft Shop

This tutorial (my first attempt at making one) I did on special request from dear friend Sunehra..........we are all always learning from her, so was more than happy to do this for her.

This is really a very easy flower to make & I have used it on this & this earlier.

MATERIALS -
1. Paper - any of your choice
2. Scallop circle dies
3. Die cutting machine
4. Mister bottle with water
5. Piercing tool / punch
6. Brad

METHOD -
1. Choose your paper (I have taken two different kinds - a handmade embossed paper & parchment paper).

2. Using the dies cut scallop circles in four sizes as shown from both the papers. So you will have eight in all.

3. Spritz all the scallops with water, scrunch each into a tight ball (while wet).


4. Leave the scrunched scallops to dry or you may use a heat gun.

5. Now carefully open them all.


6. Layer them according to size - alternate layers of both papers (same size)......eight in all.

7. Using a paper piercer/punch make a hole in the center (do not bother to be very precise it does not matter)

8. Insert a brad through the hole & fasten it to the bottom.

9. Carefully separate each layer & scrunching each layer once again.


10. Here is the finished flower - ready to be adorn any project.


Thank you so much for visiting & taking the time to comment on my blog. I love to hear from you & truly appreciate your feedback. Have a crafty day!!

Saturday, 1 June 2013

RAINBOW MAGIC

Hello Friends!!!
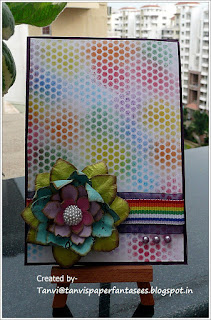
Its the first day of the month...................time for a new challenge at CATCHY CHALLENGES. Many parts of India have already received the first monsoon showers & the climate here in Bangalore is soooooo pleasant now. Its the right time to create magic with the colors of the rainbow. Well its a CATCHY challenge so a twist is a must...............use the VIBGYOR colors as a BG without a rainbow!!! Here is my inspiration for this challenge.

For the background I used a mesh & gently sponged all the seven colors randomly (memento inkpads) to create a colorful pattern, very easy peasy. The gorgeous bloom is from Itsy Bitsy. Do hop over to the challenge blog for amazing ideas by my teamies.

Linking this to - 


Thank you so much for visiting & taking the time to comment on my blog. I love to hear from you & truly appreciate your feedback. Have a crafty day!!

Monday, 27 May 2013

CAS

Hello peeps!!! 
Here is my entry for CAS(E)#29.............................inspired by Jackie's sketch. 


Also playing this at DD#54


Love the soft colors & simplicity of this card. What do you think?

Thanks for visiting my blog today. Have a fabulous week.

Tuesday, 12 March 2013

A BLACK & WHITE CARD

Hello people...............................my second post today!!!!!
This is a card I made with two challenges in mind - one a sketch & the other a color combo (black, white & red).


The bloom is handmade in three layers.


Linking this to -


Supplies Used - 
PP - W&M
CS - Itsy Bitsy
Die - Itsy Bitsy Victoria Panels
Die - Spellbinders Star Circles
Stamp - Papermania Celebration
EF - Itsy Bitsy Spring


Thanks for stopping by. 


Wednesday, 27 February 2013

Oodles of Doodles & Colors

Hello my crafty friends!
The theme of the recent BGC#25............Oodles of Doodles!!!! I made a really colorful card using the crayon resist technique..........a favorite with both my girls.
Here's the card with loads of  DOODLES...ahhh my fingers still twinge after soooooo much doodling that too with a tooth pick!!!


The layered heat embossed flower is handmade.......................used several die cut scalloped circles & punched the edges (have no clue what this punch is................if someone does please help). This is how........


A close up.........isn't it simple yet chic!


Also linking this to


Thank you so much for visiting, have a wonderful day.


Related Posts Plugin for WordPress, Blogger...