Showing posts with label stamping. Show all posts

Thursday, 23 January 2020

Distressed Book Box

Hello Crafty Souls!
Wishing you all a very HAPPY & CREATIVE 2020!
Though I have been creating regularly I missed sharing the post here on my blog & participating in challenges. 
So here I go with my first blogpost of 2020, a book box I have decoupaged using the newly launched rice papers by DRESS MY CRAFT. I wanted the distressed door to be the focal image for the box & recreate all the textures of the beautiful printed paper using my mixed media stash. Hang in there as I reveal all the details -
I carefully tore the door image & pasted it using Mod Podge Matte on the box, built on the background with chalk paints. 
The first texture I created around the arched door was concrete (Folkart Painted fnishes - Concrete)

Next I used Itsy Bitsy 2 step crackle medium, this added to the aged look I wanted.
Also used images from the rice paper for the inside of the box & continued to build on textures using sea sponge, stencils & stamps. Finally enhanced the aged look using antique wax.
For the box spine & back I chose a distressed look to coordinate with the focal image of the door & some random stamping with a crackle stamp.
This was a rather satisfying outcome, loaded with techniques to create textures for a complete aged distressed look.
Sharing this at the following challenges - 

Thank you so much for visiting & taking the time to comment on my blog. I love to hear from you & truly appreciate your feedback. Have a crafty day!

Friday, 10 May 2019

Coffee Lovers Spring/Summer Bloghop - Card 2

                                                                          Hello!          This is card 2 for the Spring/Summer Coffeelovers bloghop which is ending tonight.

Played with alcohol inks to create the background on yupo paper. The stenciled pattern was done with alcohol lift ink.
 
The water colored embellishments colored with Zig Brush pens are from Itsy Bitsy

Playing along the following challenges - 

WWCC#220 - 14.5 - Topper

DL.ART#243 - 31.5


Pinterest | Instagram | Facebook
Thank you so much for visiting & taking the time to comment on my blog. I love to hear from you & truly appreciate your feedback. Have a crafty day!

Thursday, 24 January 2019

Doily effect on Chopping board


Hello Friends & welcome here! 
I am sorry, though I have been neglecting my blog 😒 I am creating loads of projects especially decoupage & share them regularly on my facebook page & Instagram, feel free to follow me there for regular updates!
Today’s project is a chopping board wall décor piece that also serves as a post it holder.
A simple technique to add some drama to a project is to combine a shabby chic print with bright chalk paints. For this base I used papers some shabby prints.
Using a large doily as a stencil, I created a pattern on the decoupaged paper with chalk paint.
I loved the contrasting colors of the the paper & paints. To add some more texture, I have also used 1 step crackle medium on the board around the doily stencil.
Some random newsprint stamping with archival ink, further built on layers to this project.
Thank you so much for visiting & taking the time to comment on my blog. I love to hear from you & truly appreciate your feedback. Have a crafty day!

Thursday, 16 August 2018

Decoupage Coffee Table

Hello Everyone! This post is a very special one in which I bring together my love for coffee & decoupage! This is a picture heavy post, stay with me through the end & am sure who will not be disappointed.
Hubby recently replaced his car tyres. I was looking forward to put them to good use & what can be better than a coffee table for my terrace garden. Since this will be outdoors I reverse decoupaged the glass top, with the BobNBetty Roseate decopatch papers that came in my DT kit.

I selected some elements from this paper & fussy cut them, decided the layout & glued them (right side facing down) on the under side of the glass with Mod Podge Matte, followed this by another layer of decoupage – this time a newspaper print gift wrapping paper from my stash. The squeezee tool is a boon when decoupaging large surfaces like these to get rid of all the air bubbles & creases.

I love experimenting with reverse decoupage as it allows me to get two different looks on the same item (like this bottle I shared here).
This is the other side of the glass top, so perfect for a coffee lover in me!
Loving the newsprint peeking beneath this perfect coffee cup, the stamping and stenciling on & around the cup.
Loads of my coffee stamps (Tim Holtz – Fresh Brewed) were inked & I loved the outcome!
Loving the newsprint peeking beneath this perfect coffee cup, the stamping and stenciling on & around the cup.

Some more close ups –
Thank you so much for visiting & taking the time to comment on my blog. I love to hear from you & truly appreciate your feedback. Have a crafty day!

Thursday, 25 January 2018

Z fold Spinner Cards

Hello Friends!
I am at the Bob N Betty blog today. Hope you are enjoying the “Little Wonderland” inspiration posts by my teamies. This is such a balanced & well coordinated set designed for all sorts of creations - mini albums, cards, layout & such.
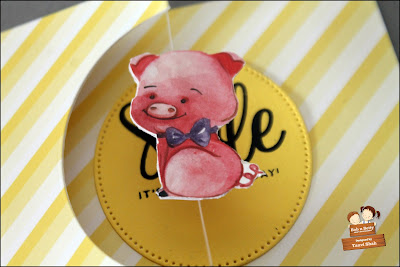
I particularly love the critter collage sheet in this pack & noticed some critters are mirror images. I fussy cut these to use them as floating critters in Z fold spinner cards.


These are side folding cards measuring 4 1/4x5 1/2". I have glued the pattern paper with an oval window panel to the card stock base, each in a color coordinating to the design paper. The sentiment was stamped on a die cut oval, a size smaller than the window.


For the spinning element, I glued the mirror image pairs back to back with the string between them. The critters spin when you open the card. Aren't these fun!


That’s it for today.

Remember you can purchase all the beautiful Bob n Betty products from our  Sales Buddies and  share your gorgeous creations on our Facebook group Bob n Betty Buddies.

Thank you so much for visiting & taking the time to comment on my blog. I love to hear from you & truly appreciate your feedback. Have a crafty day!


Tuesday, 19 December 2017

Cards with Rinea Foil paper & Joy Clair Stamps

Today I have two card shares, as part of my DT projects for Rinea blog.  
For my first card - a very simple & elegant one I have used Ruby/Gold Glossy Foiled paper to die cut the puzzle pieces, yes Rinea foil paper can be easily die cut.


Using foam squares I popped the die cut pieces to add some dimension. The sentiment is from the Love Quotes stamp set by Joy Clair.


For my second card, I used Turquoise/Gold Glossy Foiled paper, also available in the Frosted Foiled Paper variety pack. The background was created by repeated stamping using ghost ink. Again the sentiment is from the Love Quotes stamp set by Joy Clair.


It was a challenge to capture this classy background on camera. Here is a closeup -


Thank you so much for visiting & taking the time to comment on my blog. I love to hear from you & truly appreciate your feedback. Have a crafty day!
x

Sunday, 29 October 2017

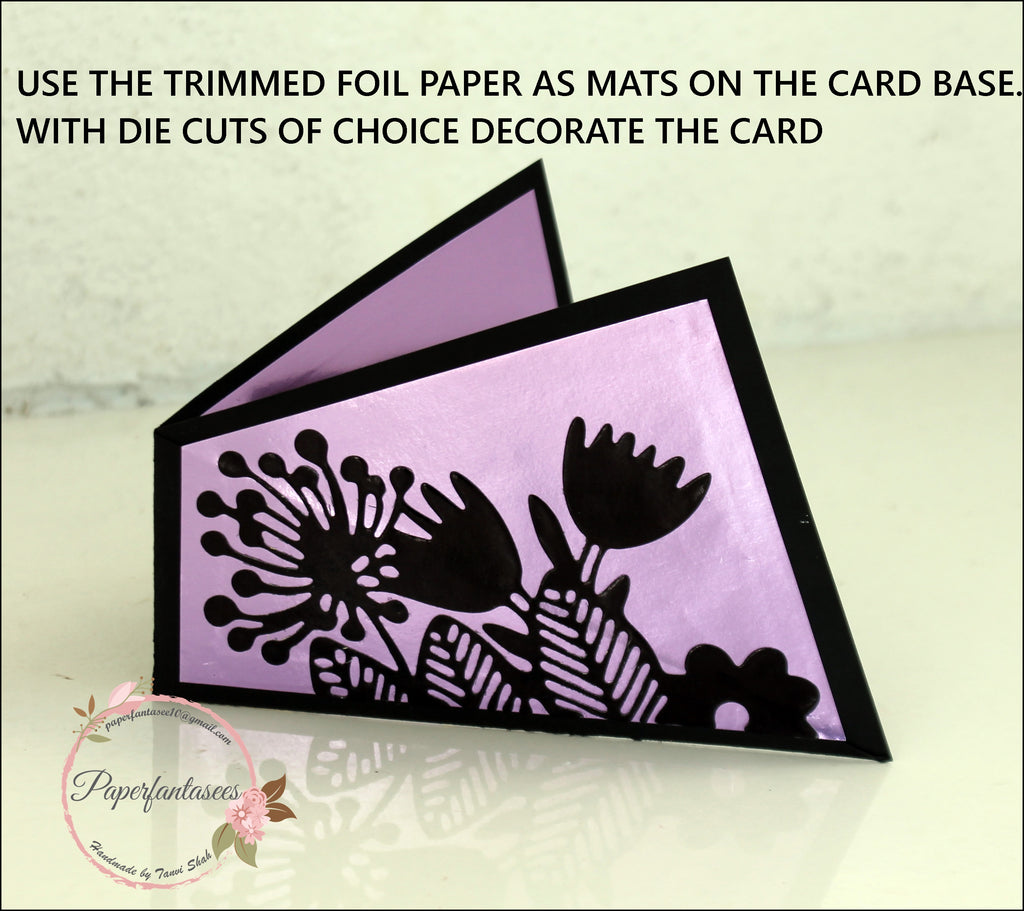
Twisted Card Tutorial

Hello & Welcome back!
I am back with a card share using Rinea Foils - Ebony/Gold, Lavender/GoldGhost Ink, and the Starburst Sentiments. I used these to make a twisted card. Here is a pictorial of the steps -


That's it from me today! Stay tuned for loads of inspiration here!
Related Posts Plugin for WordPress, Blogger...