Showing posts with label texture paste. Show all posts

Saturday, 19 May 2018

Mixed Media Journal Cover

                                                                       Hello Friends!
I am currently enjoying mixed media, thanks to the Finnabair products that came in my LetzCRaft DT kit. The combination of black & metallic colors always enthuse me & the Metallique wax pastes are just perfect for popping the hidden textures in Mixed Media.
Here is the mini journal cover which got a face lift for my post –

The cover base is MDF & the background texture is stenciled (Craftangles – Medieval Mosaic) with Decoart sand paste. I built on the layers & textures & embellished as desired, priming with black gesso at every stage & using Ranger Multimedium to glue the embellishments. The Finnabair Metallique pastes used are – Amethyst Magic & Mystic Turquoise


Here are some close up images -


Playing along the following challenges - 


Hope you enjoyed the post today & are inspired to create some Mixed Media magic!
Thank you so much for visiting & taking the time to comment on my blog. I love to hear from you & truly appreciate your feedback. Have a crafty day!

Monday, 14 May 2018

Decoupage Mixed Media Canvas


Hello Friends!
 I am loving the new range of Bob N Betty decopatch papers - very high quality 50gsm papers, a dream for all decoupage artists. You can check my previous posts with this awesome release here & here.


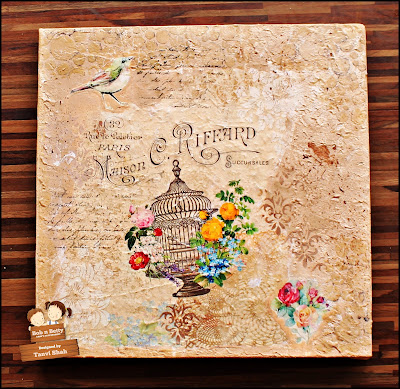
These papers are very thin & blend easily into the background to give a seamless finish, they truly do! Check the canvas I share today -


Stay with me as I take you through the steps to combine decoupage & mixed media to create unique wall decor for your homes.
The USP of these papers is the ease with which you can use them on surfaces, just like rice papers & tissues. To highlight this I started by creating a textured base for the 12x12 canvas.


Next I fussy cut a section (OLD WORLD CHARM sheet) & also some elements from the FLORAL ADORNMENTS sheet. I decided on the layout & decoupaged them on the textured canvas.


Here is a close up to show how easily it blends on the textured background.


Next I colored the canvas with coordinating chalk paints.


Some random stencilling & stamping over the textures -


To add some more textures I stenciled clear crackle paste on the edges & added some paste with the palette knife too.


To finish the canvas I splattered acrylic paint.  The Crackle paste dries clear over the textures to reveal the background through. the cracks, perfect for the image I selected! Spray with acrylic varnish to seal the canvas.


 You can grab these papers from any of our Sales Buddies   &  share your gorgeous creations using Bob n Betty papers with us on our facebook group Bob n Betty Buddies. 
Thank you for visiting & happy crafting!
Thank you so much for visiting & taking the time to comment on my blog. I love to hear from you & truly appreciate your feedback. Have a crafty day!

Monday, 5 February 2018

Scrapbook Layout with Bob N Betty "You N I" pack

Hello Friends!
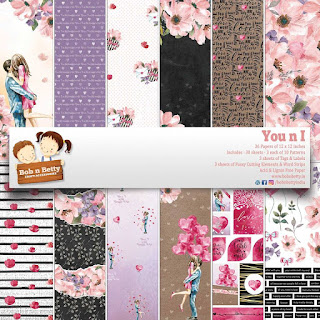
I am back with a scrapbook layout using the latest release from Bob N Betty – “You n I” ………I am in love with this pack! Its color palette of peach, kraft, black and the ultra-trendy periwinkle is such a refreshing change from the usual reds & pinks!
I have used one of the pages from the pack as the base of my layout. For layering my picture I made an envelope also from a sheet in the pack & distressed some more pieces layering.


All the flowers layered together in a bunch here are fussy cut from the collage sheet
The pack also has loads of printed sentiments for cards, albums, layouts


The pastel colors makes  “You N I” pack versatile for all love theme  projects be it Valentine’s, wedding, engagements, anniversary or even birthday.
To purchase this paper pack, go to the sales buddies section of our website, choose a distributor near you and start shopping 

Thank you so much for visiting & taking the time to comment on my blog. I love to hear from you & truly appreciate your feedback. Have a crafty day!

Friday, 6 January 2017

Monogram T

Good Morning!
Welcome to my first post of 2017 & wishing you all a very HAPPY NEW YEAR!
Sharing an altered MDF mixed media monogram letter today. 
Once again its a subtle delightful blue.


Let me share the details in the following pictures. After a generous coat of gesso & chalk paint, I added some textures by stencilling texture paste using a Tim Holtz stencil (flourish).


Love the distressed resin frame which actually "created magic" in this project! The handmade flowers are from ITSY BITSY


The coordinating tassel dangles on a pendant & do notice the floating charms in the dome there! Used liquid pearls from Ranger randomly to add some bling.


Some more stenciling using white acrylic paint. 


Linking this to the following challenges - 


SSS - Wednesday Challenge (new pack of floating charms) 11.1
SSS - Monday Challenge  (new pack of floating charms)  10.1

Thank you so much for visiting & taking the time to comment on my blog. I love to hear from you & truly appreciate your feedback. Have a crafty day!


Tuesday, 30 June 2015

Craft Your Passion#268

Good morning & welcome to another short post from me!
We have Craft Your Passion#268 live, you can find all the details here
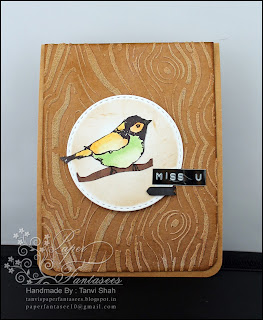
Sharing the card I made using the image sponsored by 

A Day For Daisies

Colored the image with Faber Castell color pencils, fussy cut it & mounted on Simon Says Stamp stitched circle die cut. This was the placed on a stencilled (Prima wood grain & Deco Art sand texture paste) kraft panel.


This card plays along at the following challenges - 


Thank you so much for visiting & taking the time to comment on my blog. I love to hear from you & truly appreciate your feedback. Have a crafty day!


Wednesday, 25 March 2015

CAS(E)#115

Good Morning!
A quick post to share a card made using the sketch at CAS(E)#115 -


Linking this to - 
CAS(E)#115 - 26.3
Thank you so much for visiting & taking the time to comment on my blog. I love to hear from you & truly appreciate your feedback. Have a crafty day!!


Tuesday, 9 September 2014

Monochromatic tag


 Good Morning friends.........as promised yesterday here am with another tag. This one is almost entirely done in blue. 
Let me briefly take you through the steps -
  • To begin I used TCW - birds of a feather stencil with texture paste (homemade)
    to create the base layer, let it dry & then colored over with salty ocean distress paint. 
  • Then stamped the script (stampaddicts - pot pourii) in archival black.  Added some crackle paint (rock candy) to the branches. A dash of brown & green highlights the branches.
  • Next to tone down the color I added a layer of watery gesso.............


Look at the awesome texture! Added a bit of shimmer to all the birds with my favorite Wink of Stella glitter brush pen. 

The little black butterfly is from shrink plastic! 

And the bird charm compliments the theme of the tag, don't you agree? 


The cages were highlighted using vintage photo DI.

The maroon bird escaping from the cage is a rub on & I think is perfect to break the monotony of blue in the tag. 
Next I splattered run down gesso randomly over the tag.


Thank you so much for visiting & taking the time to comment on my blog. I love to hear from you & truly appreciate your feedback. Have a crafty day!!

Monday, 8 September 2014

Tag in a tag


Good Evening!
The current challenge at Beyond Grey Challenges is to make a tag with textures. I surely wanted to play along because I just love textures.

Enjoyed playing along with texture paste (homemade) & Tim Holtz layering stencil (rays) to create the base. Blended distress inks (mustard seed, spiced marmalade, rusty hinge & fired brick) over this several times. I then placed the stencil over the tag again.............this time I placed the design between the textured rays & then misted water to create some more rays! Take a closer look between the textured rays & you will know what I mean. The script was stamped over this diagonally as if emerging from the rays & the sentiment stamped on another cardstock & glued with foam dots. A beach chair charm dangling over the awesome trim coordinates so well with the sentiment. The bottom of the tag with metal corners has a little vellum pocket for another tag which is made from shrink plastic!  You have to see this tag in person to admire the super shimmer of the wink of stella over the textured rays.


I enjoyed making this so much that I have already started with another tag & writing this post while the background dries! So please do stop by again tomorrow.

Also linking this to - 
 
Thank you so much for visiting & taking the time to comment on my blog. I love to hear from you & truly appreciate your feedback. Have a crafty day!!
Related Posts Plugin for WordPress, Blogger...